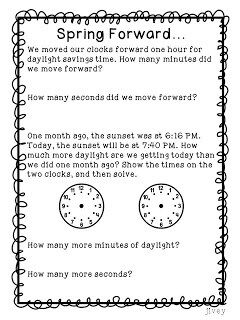
We are about to start our measurement “stuff” in Math, so I thought it would be appropriate to create a time activity for Daylight Savings Time!
Workshop Wednesday!
What is your must-have in Writer’s Workshop? In other words, your Writer’s Workshop would not be successful without… <fill in the blank>.
**Even if you don’t feel it’s a formal “Workshop” – you can share whatever you use that you can’t live without! Others can incorporate it into their “workshops!” You can link up anytime before next Wednesday, when we’ll have a new topic!**
In my room, my kiddos have two things that we use consistently.
This is an idea I stole borrowed from another teacher a few years ago. I give all of my students a yellow legal pad to do their rough drafts. I like for them to skip lines on their drafts for editing and revising purposes later, so I love these because the sheets are bigger and they aren’t “wasting” as much paper by skipping lines. The kids can keep up with what is a rough draft and what is a final by the color…and, the kids love it because it’s “different.”
You know you’re a teacher when……………….
being given a book like this excites you! I will be leading some Literacy Professional Development this summer, so the Language Arts Office bought all the leaders this book! I can’t wait to get in it! I bet it will improve my Writer’s Workshop too with all the awesome information that is in it! I love Lucy Calkins. 🙂
I can’t wait to see what you all use in your Writer’s Workshop!!
Please grab this image and link back to this post when you link up!! 🙂
document.write(‘
What’s That Falling From the Sky?!?
This Wednesday, I’m going to try my linky party again! As promised, I wanted to give you a head’s up of the focus so you can be ready… this week, I’d like for us to look at Writer’s Workshop! What is your must-have in Writer’s Workshop? In other words, your Writer’s Workshop would not be successful without… <fill in the blank>. Can’t wait to see what you all have to link up with on Workshop Wednesday!! 🙂
Now, moving on to some exciting news… I know you were all chomping at the bit last week for this and it’s finally here!!
I completed my Cloudy With a Chance of Meatballs Unit with the ADORABLE Scrappin Doodle Spaghetti clip art (as well as their Breakfast clip art and BBQ clip art and Weather Kiddos clip art… do you see the disease I have here??) – it is jam packed with some great reading comprehension pages specific for this book! Go take a peek at it in my TPT store by clicking here, or on the picture above, or any of the previews of the items below!
Need a reason to buy it? Here are all the Common Core Standards you’ll cover…
If you love using mentor texts in the classroom, be sure to check out Better Than Basal too!
It is packed with awesome activities you can use all year long!
SECURE your PDFs!!!
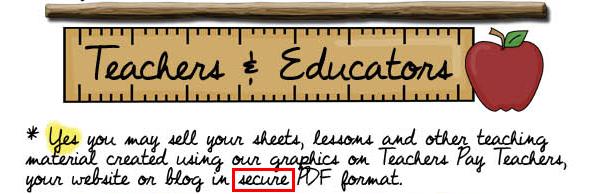
Raise your hand if you thought by saving your documents to sell on TPT or TN as a PDF, it was safe and secure? <raises hand> We are wrong! 🙁 Little did I know, you can copy images from a PDF, or even turn them into word docs unless you have actually changed security settings in the PDF. I feel awful after having seen this wording in all the clip art Terms of Use I’ve ever read:
Scrappin Doodles Terms of Use |
…and thinking this whole time I have been following the rules. I AM a rule-follower (most of the time anyway) and I certainly would not have broken this rule had I known… and I have a feeling most of you feel the same!
SOOOO, here is a tutorial on how to make your current PDFs secure… it’s super easy and fast! Re-doing and re-uploading all my TPT files, however, will not be. Urgh…
Step 1: Open your PDF in Adobe Acrobat. You must have Acrobat to secure a document-Adobe Reader does not have the capability (as far as I know).
Step 2:
Click the padlock button at the top in the toolbar, or you can go to “Advanced” and select “Security” then “Encrypt with Password.” (If you do the “or,” skip to step 4.)
Step 3:
Choose “Encrypt with Password.”
Step 4:
Click “yes,” you are sure you want to change the security. I went ahead and checked “Do not show this message again” too.
Step 5:
I left compatibility on 7.0 or higher since TPT requires you to have an updated version of Adobe anyway. I also kept the radio button selected for “Encrypt all document contents.” That way it covers everything. DO NOT CHECK “Require a password to open the document” or people won’t be able to open it! (Unless you share your password…) The only place you want to make changes is in the red box: check “Restrict editing and printing of the document.” Type in your password (make sure it’s one you’ll remember in case you need to edit the document yourself!). Change “Printing Allowed” to “High Resolution,” so people can print your document in high quality. Make sure “NONE” is selected for changes allowed. That way they cannot edit your document in any way, keeping your material original. Make sure the box for “Enable copying of text, images, and other content” is UNCHECKED- that’s really the biggie. That’s what those Terms of Use are all about. And then I would keep it checked for “Enable text access for screen reader devices for the visually impaired.” No discrimination here. 🙂
Step 6:
Workshop Wednesday! (my very first hosted linky!)
First I wanna give a big shout out and THANK YOU to Bridget at Literacy Without Worksheets. Apparently, my good luck has not worn off… I won a $25 TPT gift card in her giveaway! YAHOO!!!
That totally made my day on Monday! 🙂 Now to go through my wishlist and see what I will buy!! Decisions, decisions…
Sorry I’ve been MIA … (at least I feel like I have… I’ve hardly read any blogs, much less posted!) We had parent conferences on Monday and Tuesday. In my district, we have Early Release so that we can meet with the parents both afternoons. The kids leave at 12:15 and we stay for the parents to come in- I stayed until 4:15 Monday which wasn’t bad, but last night I was there til about 6:30. It beats staying that late for several days though!!!
As promised last week, I wanted to give you a peek into my Reader’s Workshop. This is the first year I have not had a really long Language Block. I actually really don’t like that I don’t have a long block, but nothing I can do to change it! So I have 55 minutes before lunch for Reading Workshop, and an hour and 5 minutes after lunch for Writing and Grammar. (Killer right??)
I have to use my time VERY wisely due to the little time I have and the kids that seem to be revolving in and out of my room for various services. Because I have a few kids that leave at 10:30 (the beginning of my Reading Workshop), I do not start off with a whole group mini-lesson. I know, it seems wacky… but it still works. They have their independent reading time for the first 30 minutes, which is also the time I pull groups, which is also the time they are completing a 10 minute reading skill… confused enough? 😛
I pull two groups per day during that 30 minute window. If they aren’t with me, they are either reading independently or completing one of the “stations.” The stations consist of one 10 minute skill. They can choose to either read first, and then do the station, or do the station and then read. I let them decide because it gives them ownership over their work. They must have all 4 stations done by the end of 5 days (so that gives them a little extra time to read one day, too).
Reading Comprehension is either a reading passage with 4-5 questions, or a graphic organizer we’ve learned how to use that they can fill in with their independent reading book. It just really depends on what skill we’re focusing on. Reading Response is where they write about their independent reading book using their thick questions as cues (thanks to Beth Newingham!), or a question that I give them to respond to about our read-aloud book. Again, it depends on what we’re doing. 🙂 Word Work currently is spelling with Boggle. Sometimes though, it’s a quick Greek and Latin Root activity using the current root we’re learning. And then there’s games. I shared with you in a previous post the Florida Center for Reading Research website. I have gotten all my games from there! It has taken some time to make them all of course, but it’s worth it and the kids enjoy them. They also get in some Accelerated Reader tests in that time when they’ve signed up with me.
My kids love their independent reading time because they get to read in their book nooks.
Each week, their clip moves to a new book nook. They sometimes are at their desk, or on the floor, but then they get special “nooks” when they aren’t in those places: different chairs, pillows, a big float (since I have the ocean theme) and my personal favorite, under the umbrella in the green chair (see below on the left). They have “browsing boxes” that they carry with them to their book nooks so they have everything they need right at their fingertips (no roaming the room!).
This is my class library that I’ve been talking up so much… see those two sets of shelves on the left?
Yup, I made them. Awesome, right? 😛 They were originally made to be bookbag cubbies because my first year teaching, I didn’t have hooks in my room. These suckers have lasted for a long time, even after being moved from classroom to classroom and school to school! I have stacked them on top of each other before, but I prefer them like this because they fit perfectly under the bulletin board so it saves my wall space. My book collection *might* be a bit on the hoarding side, but I just love books so much. Some of the books in my library are books from when I was younger, books from my younger brother and sister, books that I’ve purchased, and then gotta love Scholastic Book Points! The books are leveled by F&P (what my school uses) so they can access their instructional level easily.
So finally, after those 30 minutes are up (sometimes 40 because we all know how hard it is to keep groups at 15 minutes on the nose), they add their reading to their reading logs, and then I do my whole group lesson. My kids are all in the room at this time. I like to use extended texts to cover reading skills, but then I still LOVE my picture book weeks! I use one picture book for a few days, or with extended texts we read a chapter a day and do skills each day that go with that chapter. The kids really get invested in the chapter books, too! When we take our Accelerated Reader Tests at the end of the unit, they all pass! It makes me so proud. 🙂
So how does your Reader’s Workshop look? I’d love for you to link up so we can see! 🙂 I think I’d actually like to start a regular Wednesday Linky Party called Workshop Wednesdays, where we share things we do in our various workshop-style teaching. What do you think?
Please grab this button and link back here! 🙂
document.write(‘
Snowy Show and Tell Tuesday!
I’m linking up with Sunny Days in Second Grade for Winter Show and Tell Tuesday! It’s ironic because I saw Emily’s idea over at I Love My Classroom for big kid snow globe stories. I was so excited to do them this week, and then saw that Denise’s (the creator of this linky) Show and Tell was for the snow globes, too! Apparently, I’ve been out of the loop on this awesome idea for writing! 😛
We started our writing time with the cartoon, Knick Knack by Pixar. It is so cute! If you’ve never seen it, you can watch it below but DISCLAIMER!!! The one on youtube is not as kid-friendly. It was originally created back in the late 80’s, and the bikini clad girl and the mermaid CLEARLY have had some work done. 😉 You can find the kid-appropriate version at the beginning of the Finding Nemo DVD. They changed the girls, but everything else is the same…
So for YOUR viewing pleasure:
So back to the lesson… after watching the short, I had them turn and talk with a partner about what it would be like if they were trapped in a snow globe… or maybe they weren’t “trapped!” Maybe they just live there, but they encounter ANOTHER problem inside the snow globe. Some ideas they thought of were: it’s always cold, I have no friends because I’m in there by myself, someone put a spell on me and put me in a snow globe, and my favorite: people keep looking in at me with their big eyes! Once they got some ideas rolling around, I gave them this graphic organizer to begin brainstorming:
(you can download for yourself, too, by clicking on the picture!)
I want these stories to have “action!” I don’t want to read 25 stories about what their snowglobe looks like and who lives there and they play together and THE END. 🙂 So, I created this graphic organizer for that purpose. We’ve talked about how usually the problem or the conflict happens around the “middle” of a shorter narrative (in other words, not a chapter book) and the solution happens towards the end, so instead of putting beginning/middle/end on the graphic organizer, I used introduction/problem/solution to remind them they NEED to have a conflict and a resolution in their story. For “setting” they should draw what they want it to look like and label with important words to include in their story.
When my kids have finished, I think I am going to borrow Denise’s idea and take pictures of them and have them make their snowglobes they described in their story to put with their published writing!
I hope you can use these ideas! If you have some great winter ideas of your own, make sure to share them in the comments! I love getting new ideas to do in the classroom! 🙂
- « Previous Page
- 1
- …
- 44
- 45
- 46