• Home
  • Membership
  • Master Mentor Sentences
    • Mentor Sentences for K-2
    • Mentor Sentences for 3-5
  • Courses
    • K-2 Course Login
    • 3-5 Course Login
    • Master Mentor Sentences Course
    • Interactive Read Alouds
    • FREE 1-2 Mentor Text Course
    • FREE 3-5 Mentor Texts Course
  • Shop
    • My Account on Jivey’s Site
    • Shop Jivey’s Site
    • Join the Mentor Text Membership
    • Shop on TpT
    • Mentor Texts on Amazon
  • About
    • Meet Jivey
    • Disclosure & Affiliate Policy
  • Facebook
  • Instagram
  • Pinterest
  • YouTube
  • 0 items
  • Ideas by Jivey

    Jivey shares ideas and lessons to make literacy accessible for all.

    • Shop
    • Master Mentor Sentences
      • Mentor Sentences for K-2
      • Mentor Sentences for 3-5
    • Maximize Time With Mentor Texts
    • Vivid Vocabulary
    • Close Reading
    Uncategorized

    Tried It Tuesday – Editable TPT Products

    June 25, 2013

    Happy Tuesday! I had a few people ask me about how I created my Editable Sub Binder. It was actually the first time I had TRIED to create something like this, so I thought, perfect time to share! Tried It Tuesday! ๐Ÿ™‚

    I’m also linking up to Erica’s Getting Started on TPT Linky!

    **This tutorial is also now listed under my Techy Tips, with some other great tips too! Make sure to go check them out!**

    First, create your product that you want to make editable. I use Powerpoint (and I LOVE it!!) to create my products. This tutorial will only really help you if you already know your way around Powerpoint… sorry!!

    Once you have your product made, you’ll want to save it as a ppt for later in case you need to edit, but you also need to SAVE AS JPEG.

    It will ask you if you want to save only that slide, or all slides. You want to save ALL SLIDES. This will put every slide, as a JPEG, into a folder for you.

    Once you’ve done that, open a new blank Powerpoint document. Change your slide settings under Design to match what you just created (mine was standard, portrait) then click Format Background (also under Design). Under “FILL” you’ll want to click the button next to Picture or Texture Fill, then choose File to insert your pictures from the files you just made by saving your powerpoint as a JPEG.

    Select the first page (probably called Slide 1) and press open. It will insert the picture as your background- it will fill the page. Nothing can be edited on the page you created because it’s a JPEG, and your user won’t accidentally click on it and move it because it is now set as the background. Repeat this until all of your pictures have been added into the backgrounds of new slides.

    To make it editable, you will want to add text boxes.

    I typed into the text box what I thought they should do there, as well as set the size of the font to match the rest of the document.

    I also needed to add tables to some of the pages, which are editable as well with text.

    Once you have added text boxes, tables, etc to all the pages, you will want to SAVE AS Powerpoint- NOT PDF! This keeps it editable!

    Then, because some people might want the PDF file to hand-write on instead of the PPT to type into, delete all the prompt-text you typed (keep your tables though!!) and nooooooow you can SAVE AS PDF.

    I hope you found this helpful! I promise it’s not as daunting as it seems… it just takes a bit of time. ๐Ÿ™‚ This would also be a great option for people who want to share or sell their Powerpoint Slide Shows they have created, but don’t want people taking “certain liberties” and changing things… ๐Ÿ˜‰

    Make sure to go link up what you’ve tried with Holly, and see what everyone else is up to, too!

    Also, reminder, Workshop Wednesday this week is *GASP* cancelled (Shhhh, it’s ok. Keep reading!) because of a surprise… stay tuned! Make sure to come back tomorrow and see! :o) Of course, you can always link up to any week’s post from this month if you’d like to share some Pinterest finds!

    by Jessica Ivey 
    Uncategorized

    Monday Made-It – yard, fan freebies, and survey results!

    June 24, 2013

    I’m linking up with Tara today for Monday Made It!

    On Friday, I told you about all the work I had to do in my backyard… I needed to clear the branches and debris that had been tossed over into my yard when there was no one living here, as well as cut back some of the low branches on the trees.

    Well, I did it! I made my yard a WHOLE NEW YARD! Seriously! I can’t believe what a difference it made!

    Isn’t it great?!? I know, you are probably not as excited as me about this… so I won’t go on and on with a ton of pictures. But I do have to show you everything that came off that hill and those trees!!

    Honestly, this picture of the pile doesn’t even do it justice. I should have stood next to it so you could see. It was as tall as me, and was the length of my entire kitchen!

    Thanks for hanging in there with me if you’re still reading. ๐Ÿ˜›

    A couple weeks ago, I told you that I added a Fan Freebies page to my Facebook page- ONLY FANS can access the freebies!

    I did this following a very easy video made by Ms. Fultz!

    I wanted to give just a couple more tips for after you finish the video that I figured out on my own.

    #1- If you don’t want it called “New Tab 1”, when you are on your Facebook page, click the down arrow next to your tabs (in the picture below, mine is an up arrow because I’ve already clicked the down arrow so you could see the next part). Then, hover over your fan freebies tab so that a pencil appears in the top right corner.

    Click the pencil and choose Edit Settings. It will open a window like this:

    Where it says Custom Tab Name, you can change the name there!

    #2- You can also change your Tab Image, which is a little tricky if you don’t have a photography program because the image must be 111×74 pixels – which is VERY TINY. I made mine very quickly in Paint, just so there was an image there.

    In Paint, click “resize” and change the size of your canvas to 111×74 pixels. (Uncheck Maintain aspect ratio if it is checked or it will want to change the vertical number automatically.)

    I just filled the canvas with a color and added text – simple, easy peezy!

    Then I changed my Tab Image by uploading that button!

    I hope that helps if you are thinking of adding your own Fan Freebies to Facebook! :o)

    Last but not least, I made a survey last week asking for help with a future Mentor Sentence Mini-Unit that I’ll be creating! There were so many of you with a strong desire to see some non-fiction and/or chapter books, and I aim to please! So… drumroll please…… the results are in:

    Yes, that’s right. There was a TIE! So it looks like I’ll be making an American Revolution Mini-Unit AND an American Historical Figures Mini-Unit! I can’t promise you a timeline for when they’ll be done, but they will be coming SOON! :o) Thanks for all that voted! As a seller, I want to create products that I will use and that you WANT to buy!

    Also, heads up! Workshop Wednesday this week is *GASP* cancelled (Shhhh, it’s ok. Keep reading!) because of a surprise… stay tuned! Make sure to come back Wednesday and see! :o) Of course, you can always link up to any week’s post from this month if you’d like to share some Pinterest finds!

    by Jessica Ivey 
    Uncategorized

    Bloglovin’ Update – Hopefully It Will Help You!

    June 20, 2013

    Ok, friends. I feel a little better about Bloglovin’ now that I’ve played with it a bit. I wanted to share some things with you!

    Brown Bag Teacher has a great tutorial to create your account… check it out if you haven’t set up an account already.

    First of all, if you chose to log in with Facebook when you created your account, your REAL name will show as your profile name. If you want to change this, follow these easy steps AFTER you have claimed your blog… if you haven’t claimed your blog, follow step 1 below and it will come up with a “claim my blog” button. Follow the directions they give you for this, then proceed to step 2. ๐Ÿ™‚

    1. Click the down arrow on the right, next to the search blogs bar. Click on “my blog.”

    2. Click on the name of your blog, which should be in bold:

    3. At the top right, it tells who the blog is written by… if you don’t want it to say your name, click on your name. It will take you to your profile.

    4. Click Edit Profile, then change your “Full Name.” Scroll down and hit save settings… that’s it!

    Now to see your followers (which is why you might want to change your name to your blog name…when you view followers, it shows the name on their profile) – go back to the arrow at the top and click My Blog.

    When it opens, click the name of your blog…

    Then when your blog page opens, click on the followers, and your followers will be listed there!

    UNFORTUNATELY, you can’t see ALL the followers, only the most recent ones… ๐Ÿ™ Hopefully they correct this! But you can get an email notifying you every time someone adds your blog! Back under that drop-down arrow, click on settings. Scroll all the way down to notifications and make sure the box is checked:

    Yes, it says “Send me AND email when…” – grammar police, where are you??? ๐Ÿ˜›  Make sure to save settings! A few of us bloggers have gotten together and decided to email bloglovin’ support (under contact us) about getting the followers issue fixed. We figure if enough of us ask, we’ll get what we want!! ๐Ÿ™‚ So if you’re a blogger, shoot them an email!

    Another really great feature of Bloglovin’ is making groups- you can do this under “Manage My Blogs.” I have started doing this so I can quickly read through the updates of certain types of blogs. BUT- do NOT re-import your blogs from Google or it will erase all your groups that you created!

    If you need to add a button to your blog, it’s in that same dropdown menu on the top-right… it actually adds the widget for you! All you have to do is go in to your layout and move it down (it adds it to the very top).

    I know change is hard, and I went kicking and screaming, believe me… but it seems like maybe it won’t be SO bad… :o)  Hope this was helpful!

    by Jessica Ivey 
    Uncategorized

    Tried It Tuesday: Word Art Filling!

    April 23, 2013

    Happy Tuesday, Bloggy Buddies!

    This weekend, my blog joined the Facebook World. I had a little giveaway yesterday. ๐Ÿ™‚ If you missed it, I would still LOVE for you to follow me on Facebook- I will be offering “deals” that might not always be advertised here on the blog!!
    ๏ปฟ๏ปฟ

    Follow me on Facebook!

    ๏ปฟ๏ปฟ
    I started this post during bus call, so I asked a student sitting closest to me to give me 3 numbers between 1 and 22. She gave me the numbers 12, 14, and 16. So Amanda at Learning to the Core, Hilary at Second Grade is Out of This World, and Amy at Eclectic Educating- shoot me an email with your choice of item and I’ll send it to you! Congrats!! ๐Ÿ™‚

    I promise I won’t fill my posts with Facebook after today. *wink* The button will always be up on the right with my other contact buttons! ๐Ÿ™‚ Notice what is also there…….. the button for the upcoming Peace, Hope, Love, and Happiness Linky!! Make sure to get your post ready for Thursday! I hope these awesome posts fill our newsfeeds like Mrs. Stanford’s Product Swap! ๐Ÿ™‚  Wouldn’t that just give you goosebumps!?

    Ok, for today’s REAL post! I’m linking up with Holly from Fourth Grade Flipper to tell you about word art filling!

    First of all, I have to start by telling you that I am one of THOSE people who was ridiculously set in her ways and did EVERYTHING in MS Word. EVERYTHING. When I posted the directions for how to secure your pdfs, a few people let me know I was archaic and questioned- WHY was I not using Powerpoint?!? Because I’ve always used Word! I learned all the tricks and ins and outs… but I am not THAT set in my ways, so I gave it a try… and OH MY GOSH, WHERE HAVE I BEEN?!?!?!? ๐Ÿ˜› Hee hee!! I looooooove Powerpoint now, and if you haven’t tried it, you should. I made my new Workshop Wednesday button in Powerpoint, and the button for The Idea Backpack’s Common Core Series, too! And I made the text so cute by following Ashley’s (from The School Supply Addict) SIMPLE, easy-to-follow video that she posted back in February! 

    Isn’t she wonderful?! Now you can make your title pages for your TPT products even more adorable, and whatever else you might want to cute-ify!
    Now, go link up with Holly and shared what you’ve tried, and see what everyone else is trying!! ๐Ÿ™‚

    by Jessica Ivey 
    Uncategorized

    SECURE your PDFs!!!

    March 2, 2013

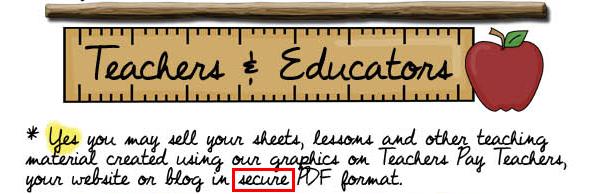
    Raise your hand if you thought by saving your documents to sell on TPT or TN as a PDF, it was safe and secure? <raises hand> We are wrong! ๐Ÿ™ Little did I know, you can copy images from a PDF, or even turn them into word docs unless you have actually changed security settings in the PDF. I feel awful after having seen this wording in all the clip art Terms of Use I’ve ever read:
    ๏ปฟ

    Scrappin Doodles Terms of Use

    …and thinking this whole time I have been following the rules. I AM a rule-follower (most of the time anyway) and I certainly would not have broken this rule had I known… and I have a feeling most of you feel the same!

    SOOOO, here is a tutorial on how to make your current PDFs secure… it’s super easy and fast! Re-doing and re-uploading all my TPT files, however, will not be. Urgh…

    Step 1: Open your PDF in Adobe Acrobat. You must have Acrobat to secure a document-Adobe Reader does not have the capability (as far as I know).

    Step 2:

    Click the padlock button at the top in the toolbar, or you can go to “Advanced” and select “Security” then “Encrypt with Password.” (If you do the “or,” skip to step 4.)

    Step 3:

    Choose “Encrypt with Password.”

    Step 4:

    Click “yes,” you are sure you want to change the security. I went ahead and checked “Do not show this message again” too.

    Step 5:

    I left compatibility on 7.0 or higher since TPT requires you to have an updated version of Adobe anyway. I also kept the radio button selected for “Encrypt all document contents.” That way it covers everything. DO NOT CHECK “Require a password to open the document” or people won’t be able to open it! (Unless you share your password…) The only place you want to make changes is in the red box: check “Restrict editing and printing of the document.” Type in your password (make sure it’s one you’ll remember in case you need to edit the document yourself!). Change “Printing Allowed” to “High Resolution,” so people can print your document in high quality. Make sure “NONE” is selected for changes allowed. That way they cannot edit your document in any way, keeping your material original. Make sure the box for “Enable copying of text, images, and other content” is UNCHECKED- that’s really the biggie. That’s what those Terms of Use are all about. And then I would keep it checked for “Enable text access for screen reader devices for the visually impaired.” No discrimination here. ๐Ÿ™‚

    Step 6:

    Re-enter your permissions password…
    Step 7:
    And that’s it!!


    You are now secured!๏ปฟ I hope this tutorial helps you. I promise it’s super-easy to do, and now, you won’t be breaking any Terms of Use! And your work will be kept unaltered and “sacred,” too!
    As for saving after you create a new item- if you create it in Word, when you Save As PDF, follow these steps when it opens as a PDF.
    If you create it in PowerPoint, click on print then at the bottom, click on PDF, and select “Save as PDF.” There is a box that brings up what the document can be renamed as, but underneath that is a box for “Security Options”. Click that. Then just check “Require password to copy text, images, and other content” and fill in your password.  *Thank you to Christy from Teaching In Oz for this tip!!*
    I think Christy may have a different version of PPT, so hers is a little different… On my version, I go to Print, and choose my printer as Adobe PDF. Then select Printer Properties… where it says Adobe PDF Security, select Reconfirm Security for each job, then click edit. That screen should look just like the one from the tutorial in this post.
    Here are some tips from Aimee at Pencils, Books, and Dirty Looks for Mac Users! I found out that you do not have to purchase Adobe Acrobat to secure your PDFs. Simply open your PDF through preview (right click on your PDF for the menu and the pick Open with, the click preview). Next go to the menu and select print. If you are in preview you will see a drop menu for PDF on the bottom left. Click that and go to Save as PDF. The next screen to pop up has a Security Options button. When you click on that, you will get three choices. Check “Require password to copy text, images and other content.” DO NOT check the other options or your buyers will not be able to open or print your product. If my explanation does not make sense, check out this youtube video. http://www.youtube.com/watch?v=1GxmzmugVU0
    For those of you without Acrobat, Nicki at Mrs. Thigpen’s Kindergarten suggested getting PDFill for free to do encryptions.
    I hope this helps! Anyone else that figures out tips along the way, I’ll be glad to add them to this post, just I have been doing! ๐Ÿ™‚


    by Jessica Ivey 

    Facebook

    Ideas By Jivey

    10 hours ago

    Ideas By Jivey
    The TPT sale is ON and now is just as good a time as any to start mentor sentences in your classroom!What are you waiting for?? Select your grade in the custom categories on the lefthand side of my store to get just what you need! www.teacherspayteachers.com/Store/Ideas-By-Jivey ... See MoreSee Less

    Photo

    View on Facebook
    · Share

    Share on Facebook Share on Twitter Share on Linked In Share by Email

    Ideas By Jivey

    2 days ago

    Ideas By Jivey
    The International Day of Women and Girls in Science is on February 11! I've made some units for a few great books that would be perfect to share in celebration while also teaching your ELA skills.The Leaf Detective is the biography of Meg Lowman, a groundbreaking female scientist called a "real life Lorax" by National Geographic, who was determined to investigate the marvelous, undiscovered world of the rainforest treetops.Grab the unit that aligns with this amazing mentor text: www.ideasbyjivey.com/product/the-leaf-detective-mentor-text-digital-print-unit/ ... See MoreSee Less

    Photo

    View on Facebook
    · Share

    Share on Facebook Share on Twitter Share on Linked In Share by Email

    Ideas By Jivey

    3 days ago

    Ideas By Jivey
    The International Day of Women and Girls in Science is on February 11! I've made some units for a few great books that would be perfect to share in celebration while also teaching your ELA skills.Dinosaur Lady is a beautifully illustrated picture book biography of Mary Anning that will enlighten children about the discovery of the dinosaurs and the importance of female scientists.Grab the unit that aligns with this amazing mentor text: www.ideasbyjivey.com/product/dinosaur-lady-mentor-text-unit-for-grades-3-5/ ... See MoreSee Less

    Photo

    View on Facebook
    · Share

    Share on Facebook Share on Twitter Share on Linked In Share by Email

    Pinterest

    Instagram

    The TPT sale is ON and now is just as good a time The TPT sale is ON and now is just as good a time as any to start #mentorsentences in your classroom!

What are you waiting for?? Select your grade in the custom categories on the lefthand side of my store to get just what you need! 

Link in profile: https://www.teacherspayteachers.com/Store/Ideas-By-Jivey

#ideasbyjivey #mentortexts #iteachtoo #fabulousfeedback #teacherspayteachers #teacherspayteacherssale #tptsale2023
    The International Day of Women and Girls in Scienc The International Day of Women and Girls in Science is on February 11! I've made some units for a few great books that would be perfect to share in celebration while also teaching your ELA skills.

The Leaf Detective is the biography of Meg Lowman, a groundbreaking female scientist called a "real life Lorax" by National Geographic, who was determined to investigate the marvelous, undiscovered world of the rainforest treetops.

Grab the unit that aligns with this amazing #mentortext at the link in my profile!

https://www.ideasbyjivey.com/product/the-leaf-detective-mentor-text-digital-print-unit/

#picturebooks #internationaldayofwomeninscience #internationaldayofgirlsinscience #mentorsentences #teachersfollowteachers #ideasbyjivey #iteach345 #upperelementaryteacher #iteach3rd #iteach4th #iteach5th
    The International Day of Women and Girls in Scienc The International Day of Women and Girls in Science is on February 11! I've made some units for a few great books that would be perfect to share in celebration while also teaching your ELA skills.

Dinosaur Lady is a beautifully illustrated picture book biography of Mary Anning that will enlighten children about the discovery of the dinosaurs and the importance of female scientists.

Grab the unit that aligns with this amazing #mentortext at the link in my profile!

https://www.ideasbyjivey.com/product/the-leaf-detective-mentor-text-digital-print-unit/

#picturebooks #internationaldayofwomeninscience #internationaldayofgirlsinscience #mentorsentences #teachersfollowteachers #ideasbyjivey #iteach345 #upperelementaryteacher #iteach3rd #iteach4th #iteach5th
    The latest Primary Mentor Text Club book (voted fo The latest Primary Mentor Text Club book (voted for by the #teachers who own this growing bundle) is Over and Under the Pond by Kate Messner, and WOW what a great book to use for a true ELA-Science integration!! 

The unit I created for this one aligns life science (ecosystems, and classifying and describing animals) with shared research, using text and pictures to learn, as well as writing with vivid verbs and prepositions!

Check it out at the link in my profile! https://www.teacherspayteachers.com/Product/Over-and-Under-the-Pond-Life-Science-Integration-Mentor-Text-Unit-Grades-1-2-9078283

#mentortext #mentorsentence #ideasbyjivey #iteach1 #iteach2 #iteach1st #iteach2nd #2ndgradescience #1stgradescience #teacherspayteachers #teachersofig  #teachersfollowteachers
    Are you reading a fun book for Groundhog Day? ๐ŸŒž Are you reading a fun book for Groundhog Day? ๐ŸŒž โ„๏ธ 

Check out my February book idea list! Link in profile! Need a unit to go along with one of these? DM me the title for a link! 

#groundhogday #groundhogdayintheclassroom #ideasbyjivey #iteachtoo #mentortexts #mentorsentences 

 https://www.amazon.com/shop/ideasbyjivey/list/30LEKEOLP7026?ref_=cm_sw_r_apin_aipsflist_aipsfideasbyjivey_NSV9QRK52KNNAPCEJ5B7
    ๐ŸŒž Groundhog Gets A Say is a fun book for kids o ๐ŸŒž Groundhog Gets A Say is a fun book for kids of any age, but I especially liked to use this #mentortext to tie in some research skills and #opinionwriting!

The book is written as a narrative, but is filled with facts about groundhogs as the main character tries to convince everyone that he deserves more than just ONE day of recognition.

The unit I made for this book includes printables for text features, note-taking from text, fact and opinion, main idea and details, context clues, a writing brainstorm organizer, plus a #mentorsentence lesson for relative pronouns and contextual vocabulary activities! 

I'd love you to check it out on my website at the link in my profile: https://www.ideasbyjivey.com/product/groundhog-gets-a-say-unit/

You can also find it in my TPT store, too! 

#ideasbyjivey #teachersfollowteachers #groundhogdayintheclassroom #upperelementary #mentortextmonday
    ๐Ÿ˜ The latest seasonal club unit for #uppergrade ๐Ÿ˜ The latest seasonal club unit for #uppergrades is completed, and you'll definitely want to grab it before next week! 

Groundhog Weather School by Joan Holub is an informative #mentortext about groundhogs, Groundhog Day, and weather, but it's presented in an entertaining way that will keep your students laughing while they learn. ๐Ÿ˜‚

โœ… With this unit I created, you'll receive a week of explicit lesson plans to go along with the book. 

๐Ÿค“ You'll get everything you need to teach about organized notetaking, tier 3 vocabulary, word parts, and types of sentences, plus you'll be able integrate it all with science: weather, seasons, and groundhogs! 

Grab it at the link in my profile: https://www.teacherspayteachers.com/Product/Groundhog-Weather-School-Mentor-Text-Unit-Grades-3-5-Groundhog-Day-Seasons-9006611 #ideasbyjivey #mentorsentence #teacherspayteachers #teachersfollowteachers #groundhogdayintheclassroom #upperelementary #iteach345
    โ„๏ธ There are so many fantastic #picturebooks t โ„๏ธ There are so many fantastic #picturebooks to use in January with a snowy winter theme. 

๐Ÿ“– If you work with early emergent readers, this #mentorsentences mini-unit is perfect for you! 

There are lessons for five snowy winter-themed books to help students grasp language through a balanced literacy approach. 

Check it out at the link in my profile! #ideasbyjivey #iteachk #mentortexts #teacherspayteachers #teachersfollowteachers https://www.teacherspayteachers.com/Product/Mentor-Sentences-Mini-Unit-Snowy-Winter-Books-for-Early-Emergent-Readers-2293853
    Can students actually think critically about... GR Can students actually think critically about... GRAMMAR?!? ๐Ÿค”

You bet they can! ๐Ÿฅณ

Check out how at the link in my profile! https://www.ideasbyjivey.com/higher-order-thinking-questions-for-grammar-and-writing/ 

#ideasbyjivey #mentorsentences #mentorsentence #iteachtoo #teachersfollowteachers #teachgrammar #iteach2nd #iteach3rd #iteach4th #iteach5th
    Load More... Follow on Instagram

    Copyright © 2023 · Prima Donna theme by Georgia Lou Studios

    Copyright © 2023 ยท Prima Donna on Genesis Framework ยท WordPress ยท Log in

    This website uses cookies to ensure you get the best experience on our website. See full disclosure here.โ€‹

    accept

    This website uses cookies to ensure you get the best experience on our website.
    See full disclosure here.โ€‹

    accept